Defining Menus
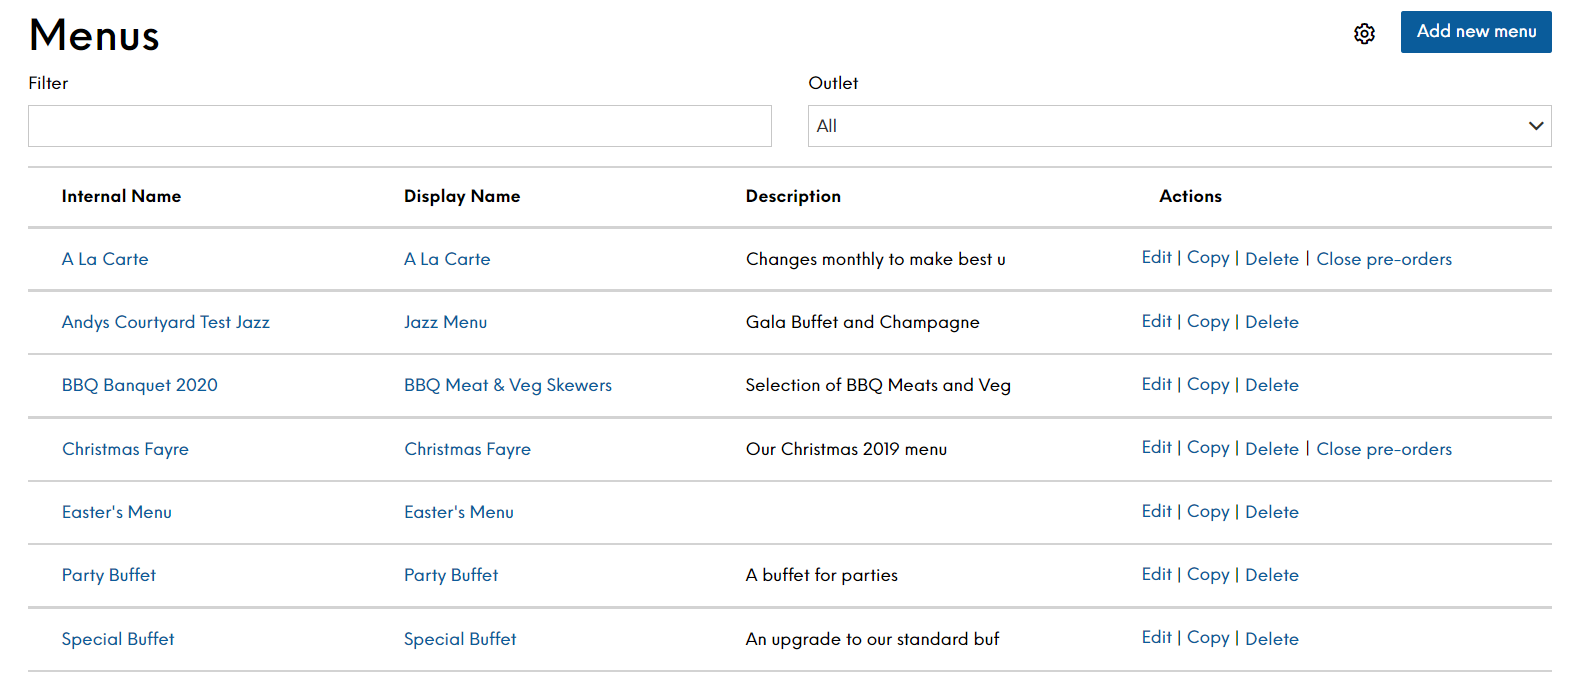
The Menus screen displays all the menus currently defined in Events for your Estate.
Menus can be defined for different times of the day, such as lunch or Early-Bird, created in line with occasions that have already been set up, for example a Christmas Menu, or a daily menu that is available at all times.
If you are using iOrder, you can link menus in Events with menus that are set up in iOrder. This will allow menus in Events to be enabled for pre-order. When configured, the guests can access a pre-order screen through the Guest Portal and select their menus ahead of time. The selected menu will then be sent to the POS automatically on the day of the booking.
You are able to filter directly the menus displayed by typing the name of the menu you want to find, or you can filter by company or site to limit the menus that are displayed. This will assist you to find the menu that you are looking for much quicker. Please note that company and site names are taken from the Internal Name configured for the site or company in Launchpad. The Internal Name is for your use only and is not be displayed to the guest. If you want to change the internal name, please contact your Zonal Account Representative.
When adding or editing a menu, the screen is divided into four Menu tab pages allowing you to define:
-
Details – complete basic menu parameters
-
Payments – define deposit, pre-payment and pre-authorisation requirements
-
Pre-order – define the pre-order settings
-
Site caps – define booking and cover capacity for your estate
Adding a New Menu
To create a new menu:
-
Select Add new Menu
On the Details tab:
-
Enter the names for the new menu
The Internal Name is for internal use only and is not displayed to the guest. The Display Name is displayed to the guest on the guest portal, and is also shown throughout the booking journey and on all email communications. These two names are the only mandatory fields
-
Define the optional fields as required. The more optional fields you define, the greater the control you have over your new menu
-
Description Enter a description of the menu
The description can be used to display additional information on the widget. This could include availability, such as the hours of the Early-bird / Theatre menu. This is displayed to the guest as part of the event-booking journey. The first 30 characters are displayed on the Menu summary page.
-
External Menu URL Add a URL link to your menu
The URL must be https. This link can be accessed through a View Menu link in the host app and displayed to the guests during the booking journey. It will also show as a link in the Guest Portal when that menu has been selected
-
Menu Images Add up to 10 URL links and descriptions to images that will be associated with a menu. These images will be returned in the External Events API for you to create a more enticing booking journey for your guests
-
Minimum Covers Enter the minimum number of covers for which you are prepared to offer this menu
Customers will be unable to make a confirmed booking if the number of covers is above the defined maximum. This field can be used together with the maximum number or on its own
-
Maximum Covers Enter the maximum number of covers for which you are prepared to offer this menu
Customers will be unable to make a confirmed booking if the number of covers is above the defined maximum. This field can be used together with the minimum number or on its own
If you do not set the minimum or maximum number of covers, guests will be able to request this menu with any number of covers
-
Maximum Advance Booking Enter the maximum amount of time in advance that this menu can be requested. This field can be used together with the minimum notice or on its own
-
Maximum Advance Booking Type Define the measurement of time for the above in terms of years, months, weeks, days, hours or minutes
-
Minimum Notice Enter the minimum amount of time in advance that this menu can be requested. This field can be used together with the maximum advance booking time or on its own
-
Minimum Notice Type Define the measurement of time for the above in terms of years, months, weeks, days, hours or minutes
-
Companies Select the companies that will offer this menu. Selecting a company means all sites in that company will be able to select the menu.
-
Use Ctrl + click to select multiple companies if required. The number of companies selected will be shown for your reference.
-
Sites Select the sites that will offer this menu
Use Ctrl + click to select multiple sites if required. The number of sites selected will be shown for your reference
If you just want to use the menu at a few sites, you do not need to select a company
If you do not select a company or a site, the menu will be enabled for all sites and companies within your estate
If you want to enable pre-order, you must have one of the following populated: Always Pre-order, Minimum covers for pre-order OR a pre-order schedule (which can be set up when editing a menu after the initial menu details have been set up
-
Channels By default, each menu will be available on all channels but you can configure which channels it is available on (from Events Host app, API, Widget, Tables Host app). For example, this can be used to have menus that can only be selected within the Events host app. These menus could have different deposit and pre-order requirements to the ones that are publicly available via the Widget or API integrators
-
-
Select Save Changes when complete
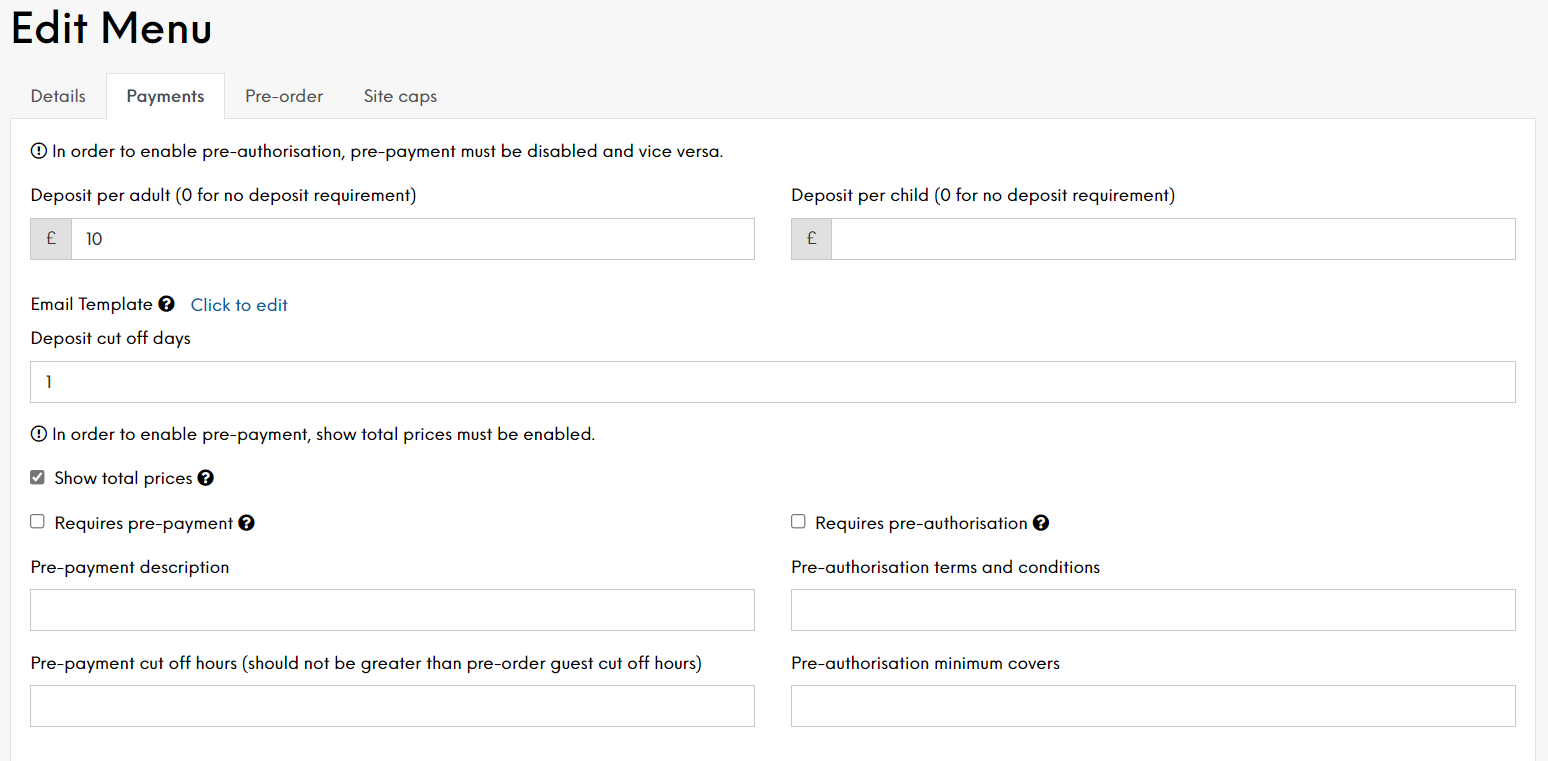
Configuring Payments for a Menu
You can use the Payments tab to configure menus to require the event organiser to enter payment details to confirm their booking. (Braintree payment gateway customers only)
To configure payments for a menu:
-
Select Add new Menu or select Edit alongside an existing menu
-
Select the Payments tab:
-
Define the payment details as required:
-
Deposit per Adult Enter the deposit value that must be taken for all adult covers. If no deposit is required, this can be left blank. If Pre-authorisation is enabled, the deposit value entered here is taken as the default amount for charging for no-show bookings
-
Deposit per Child Enter the deposit value that must be taken for all child covers. If no deposit is required, this can be left blank. If Pre-authorisation is enabled, the deposit value entered here is taken as the default amount for charging for no-show bookings
-
Deposit cut off days Enter the number of cut off days to determine when the deposit is due
This defines the number of days prior to a booking date that the deposit becomes due. This will not force any cancellation of the booking, the host will be able to see and manage any outstanding deposits and respond accordingly
This will default to one (1) day, so the deposit will be due the day before arrival
-
Requires Pre-Payment. Select this check-box to require full pre-payment of a pre-order prior to guest arrival. If selected, you must also configure the menu for pre-order. Pre-authorisation must be disabled before this option can be selected
-
Pre-payment description Enter a description to explain (to guest portal users) what pre-payments they need to make
-
Pre-payment cut-off hours Enter the number of hours prior to the pre-order being sent to the till, as set (by the estate) in Pre-Order by which time the guest must make their pre-payment
-
Requires Pre-Authorisation. Select this check-box to enable pre-authorisation. To enable pre-authorisation, you must be integrated with Braintree. For more information, please refer to page 32. Pre-payment must be disabled before this option can be selected
-
Pre-authorisation terms and conditions Enter a description of how you intend to use the customer’s card details. This is displayed to the user when entering their card details
-
Pre-authorisation minimum covers Enter the minimum number of covers that are required before pre-authorisation is activated
-
-
Select Save Changes
Events does not hold the pre-auth amount and this amount is not displayed anywhere to the customer. Instead Events simply verifies that the card is valid and in case of a no-show or a booking cancellation an Events Host can manually charge the pre-authorised card within up to 24 hours after the booking date/time or the cancellation, whatever is applicable. It’s worth noting that the card is not charged automatically, an Events Host should do it manually and only within 24 hours. Moreover, card details are removed after charging, so an Events Host can only charge once.
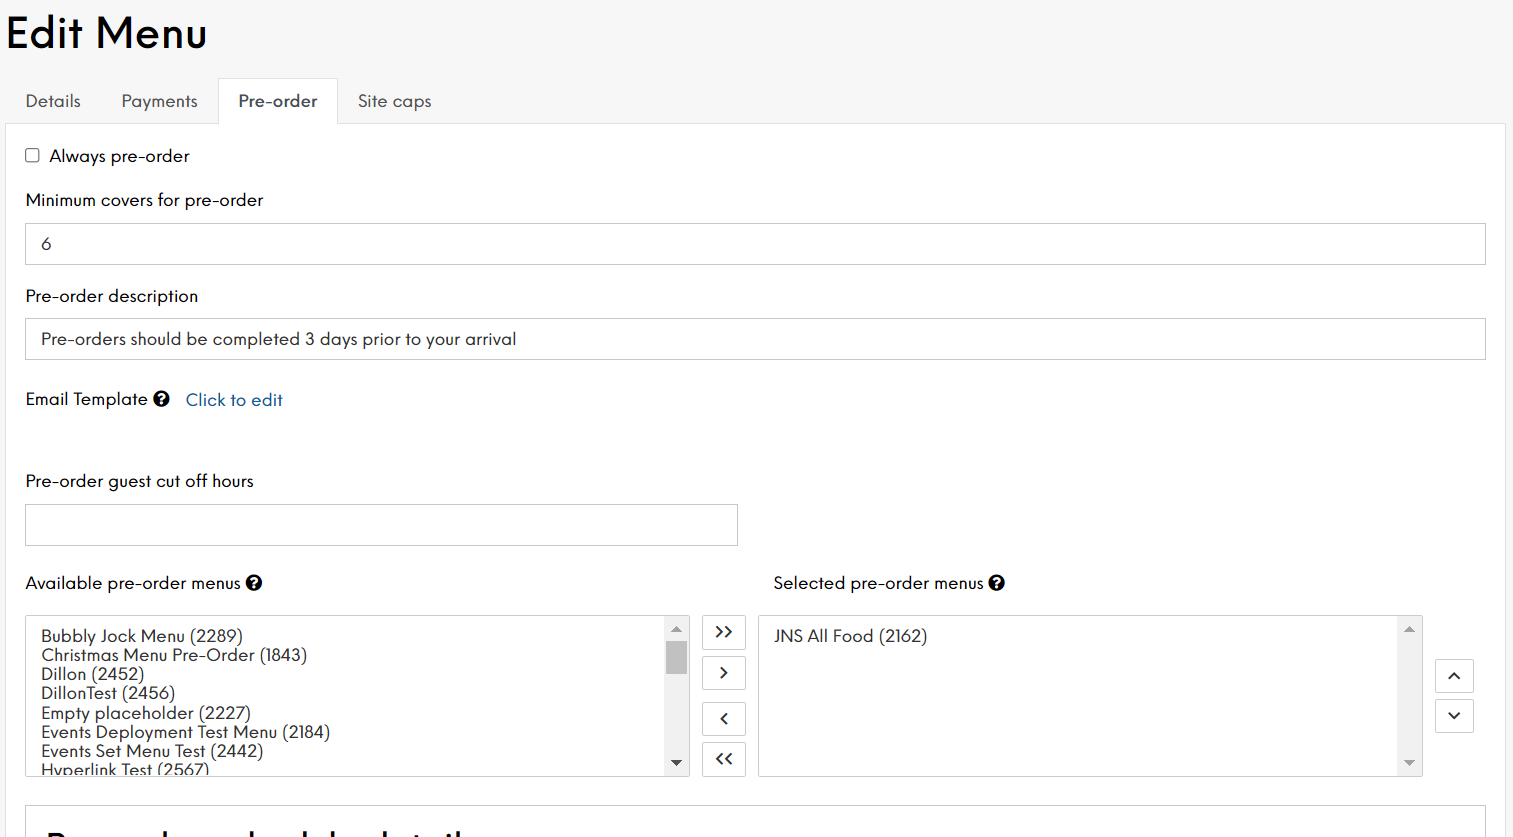
Setting Up Pre-Order for a Menu
Before setting up pre-order, you must have Aztec, ZCF and iOrder configured, and the menus in iOrder must be enabled for pre-order.
Within the Events Menu configuration, you must enable pre-order by either:
-
Selecting 'Always pre-order'
-
Adding a 'Minimum covers for pre-order'
-
Adding a pre-order schedule (can be added when editing a saved menu – see below)
You can add all three of these, but ‘Always pre-order’ will override all of the other options.
To set up Pre-order:
-
Select the Menus option
-
Select Edit alongside the required menu
-
Select the Pre-Order tab
-
Define the Pre-order settings as required:
-
Select the Always pre-order check-box if you want this menu to have a pre-order regardless of the number of covers. When selected, it will override any minimum covers or pre-order schedules that are be set up. Enter the minimum number of covers before pre-order will be initiated
-
Minimum covers for pre-order If you only want the menu to force a pre-order when the booking is for more than a certain number of covers, leave the Always Pre-Order check-box unchecked and enter the minimum number of covers for which you will take pre-orders. Customers will not be offered the opportunity to pre-order if the number of covers is below the defined minimum
-
Pre-order Description Enter a description to outline the pre-order restrictions (i.e. min covers and cut-off dates) to host and guest users. This information is displayed to the guest as part of the event booking journey
-
Pre-order guest cut off hours The cut off is the number of hours prior to the pre-order being sent to the till, as set (by estate) in Pre-Order, after which the pre-order will close for any further updates by the guest. This will default to 24hrs prior to arrival time
-
Available and Selected pre-order menus Add the relevant iOrder menu or menus using the selection boxes. The left hand box shows all available menus and you can the select and move this to the right hand side to associate them to the Events menu. If selecting multiple menus, these should be re-ordered using the arrow buttons into the order you would like them to be displayed to guests. For example a Drinks menu might be after the food menu
The pre-order schedule section allows you convert a normal menu into a pre-order menu for a defined period
-
-
Select the start date and time from which you want to allow customers to pre-order
-
Select the end date and time after which the pre-order function will be unavailable
-
Select Save Changes
When the menu is closed for pre-order, the guest portal and the Host app will show ‘Closed for pre-order’ with no link to the pre-order screen.
When the menu is Open for pre-order, the guest portal and the Host app will show ‘Open for pre-order’, with a link that will direct the guest or host to the pre-order selection screen.
These menus are static once they have been selected in Events from iOrder and any changes made to the menu in Aztec or iOrder will not be passed to the pre-order
The CSS for the pre-order widget is determined in the Widgets section.
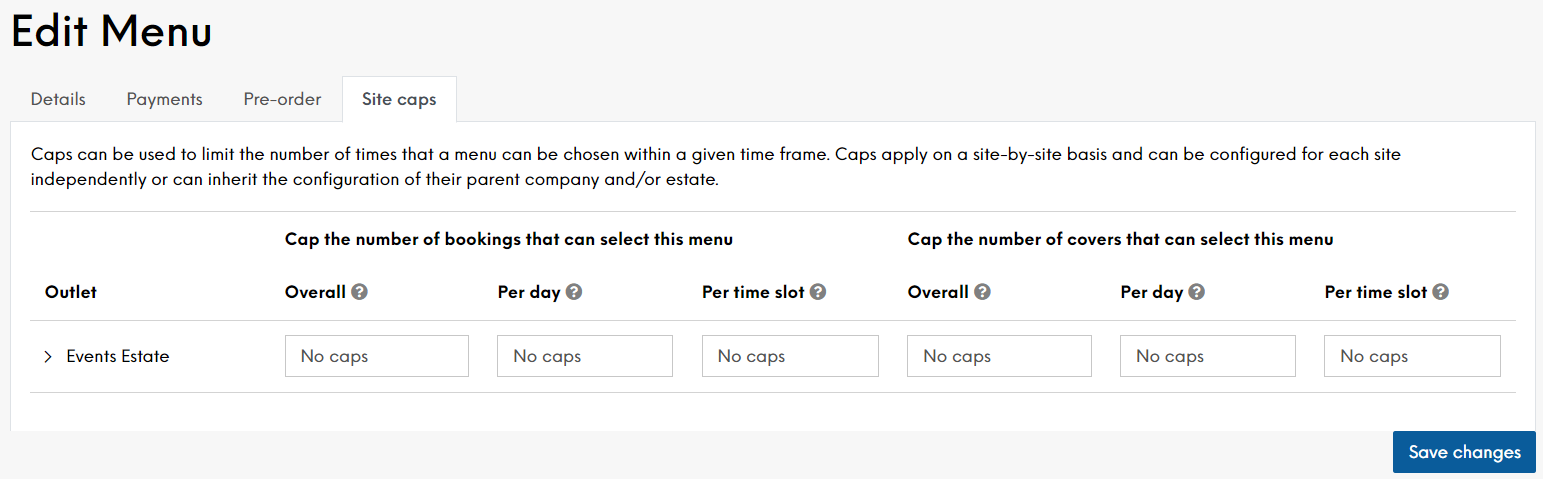
Setting Capacity for a Menu
Events allows you to set the capacity for any menu so that once capacity is reached, the menu is no longer made available to new bookings. You can apply capacity restrictions to an estate, a parent company and/or individual sites. Capacity settings are inherited from the company and/or the estate, so once defined at estate or company level, that value is applied to every site below it in the hierarchy. Adding a capacity at site level will override the inherited default.
Capacity settings can be based on the number of bookings, the total number of covers or a combination of both, and these can apply per time slot, per day and/or to the lifetime of the menu.
To define a capacity for a menu:
-
When adding or editing a menu, select the Site caps tab
-
Expand the hierarchy as required
-
Decide how you want to apply the capacity restriction and enter the required capacity
By Bookings Overall Set the capacity by total number of times this menu can be selected for a booking. Once the capacity is reached, this menu will no longer be available to customers for selection at that site Per Day Set the capacity by total number of times menu can be selected on any given day. Once the capacity is reached, this menu will no longer be available to customers for selection at that site for that day Per Timeslot Set the capacity by total number of times this menu can be selected for a given timeslot. Once the capacity is reached, this menu will no longer be available to customers for selection at that site for that timeslot By Bookings Overall Set the capacity by total number of times this menu can be selected for a booking. Once the capacity is reached, this menu will no longer be available to customers for selection at that site Per Day Set the capacity by total number of times menu can be selected on any given day. Once the capacity is reached, this menu will no longer be available to customers for selection at that site for that day Per Timeslot Set the capacity by total number of times this menu can be selected for a given timeslot. Once the capacity is reached, this menu will no longer be available to customers for selection at that site for that timeslot -
Select Save Changes when complete
Hosts can still select menus that have reached their capacity, but Events will display a warning icon for those menus
Editing a Menu
To edit a menu:
-
Select Edit on the Menu screen or Edit Menu on the Menu Details screen to modify an existing menu
While you can delete a menu, you must ensure that it is not currently in use before doing so
The Edit option allows you to change any of the information already entered and also shows additional settings that are required to create a schedule for this menu and a schedule for the pre-order. You can also choose the channels (from Events Host app, API, Widget, Tables Host app) to which the menu applies
Scheduling a Menu
Once you have created a menu, you will need to edit it to add a schedule. When you edit a menu, an additional section is displayed at the bottom of the form where you can schedule a pre-order and an additional section where you can enter your menu scheduling details
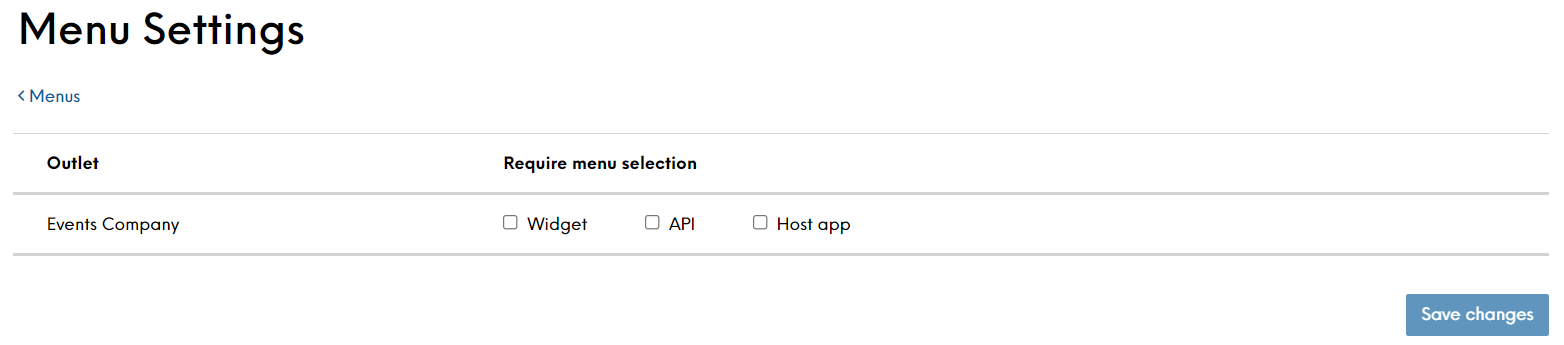
Making Menu Selection Mandatory
You can define that a menu must be selected as part of the booking journey based on the channel on which the booking is received. For example, the menu can be required to be selected by the guest as part of the online booking journey using the booking widget, by the host when capturing a booking on the guest's behalf within the host app, and/or by any 3rd party application that integrates with the Events API.
Select the cog icon at the top right, next to Add New Menu to open the Menu Settings screen. 
Here you can choose to make menus mandatory individually for the Widget, API and/or Host App.
When these are selected, it is not possible to complete a booking without selecting a menu.